Preserving Classes

We are excited to continue offering preserving classes at The Depanneur in 2014. Stay tuned for details.

Interested in learning how to preserve in the privacy of your own home. I am offering individual or group home classes. I will come prepared with the recipe, the tools and the supplies. You and your friends will walk away with the knowledge and some tasty treats. If this sounds interesting send me an email.

Blog Index
The journal that this archive was targeting has been deleted. Please update your configuration.
Navigation

Entries in Tips and Tricks (11)

Sunday
Jan122014

Marmalade - Superfine, Fine, Medium or Thick Cut

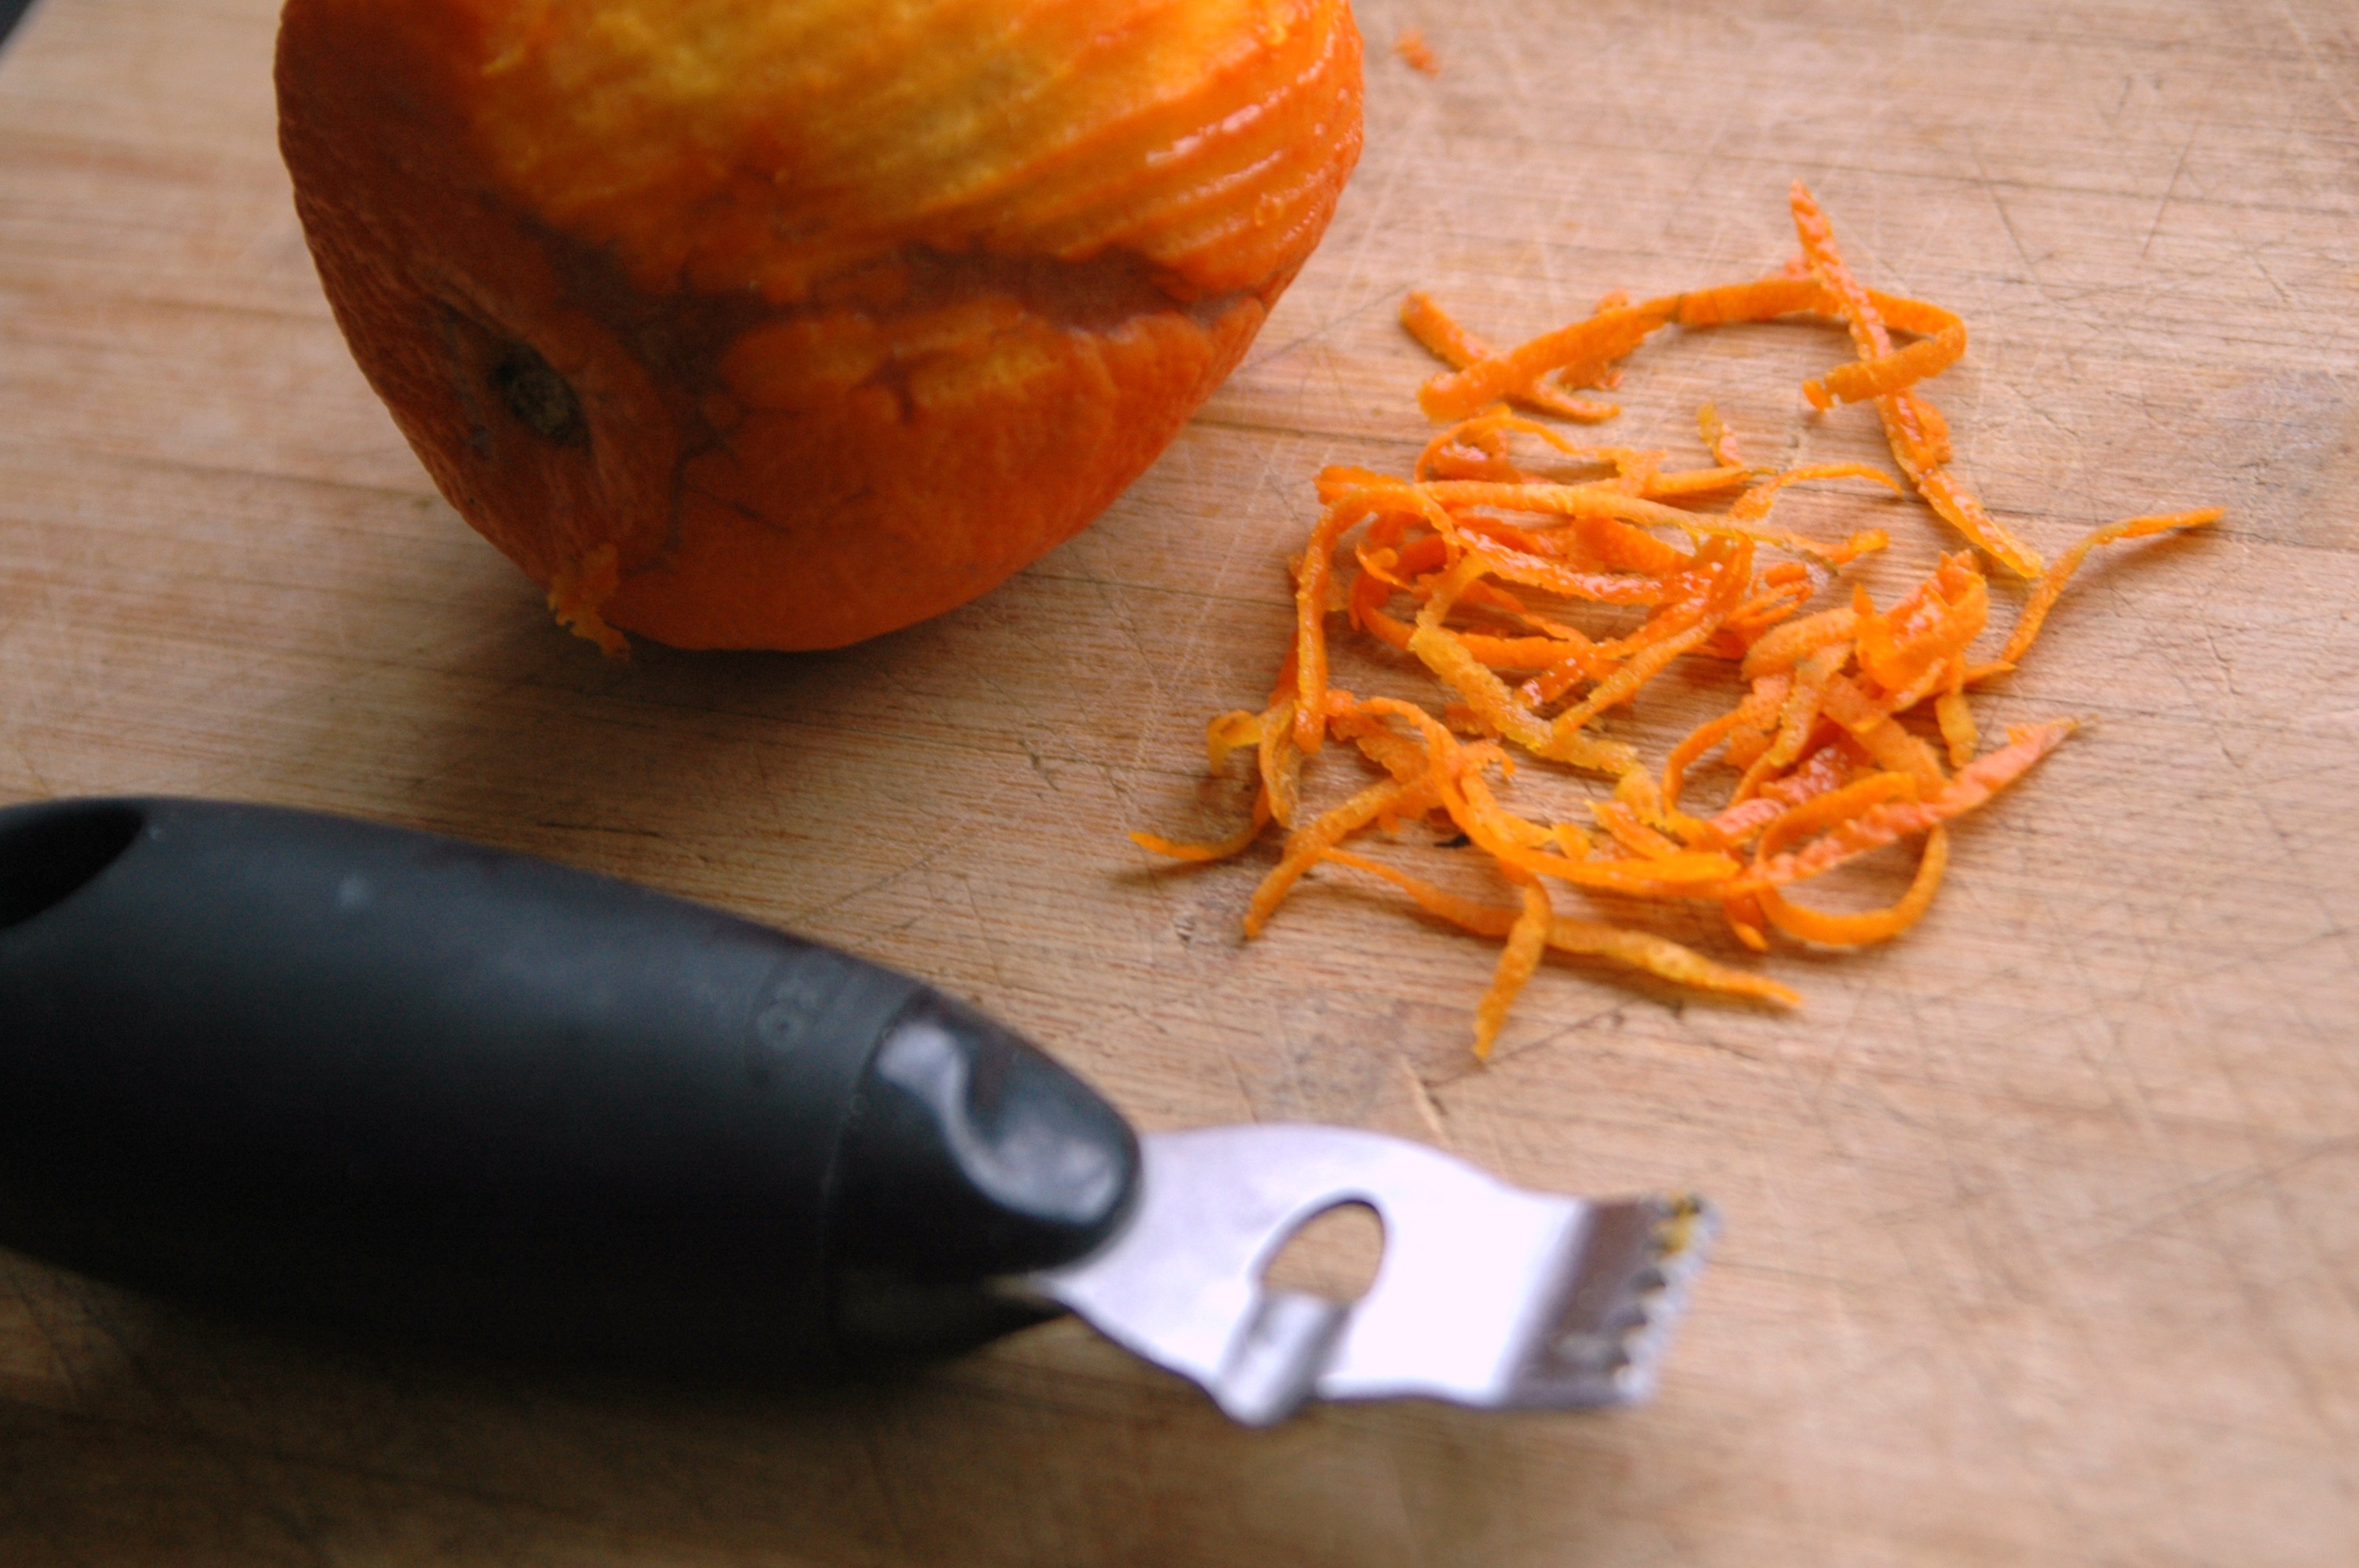
Superfine peel - best obtained with a zester

When you make your marmalade, do you slice the peel real thin?

Do you zest it very slowly, or cut it while you grin?

Eat that thick cut, thin cut marmalade, but tell me when I ask,

when you make your marmalade, do you cut the peel real fast?

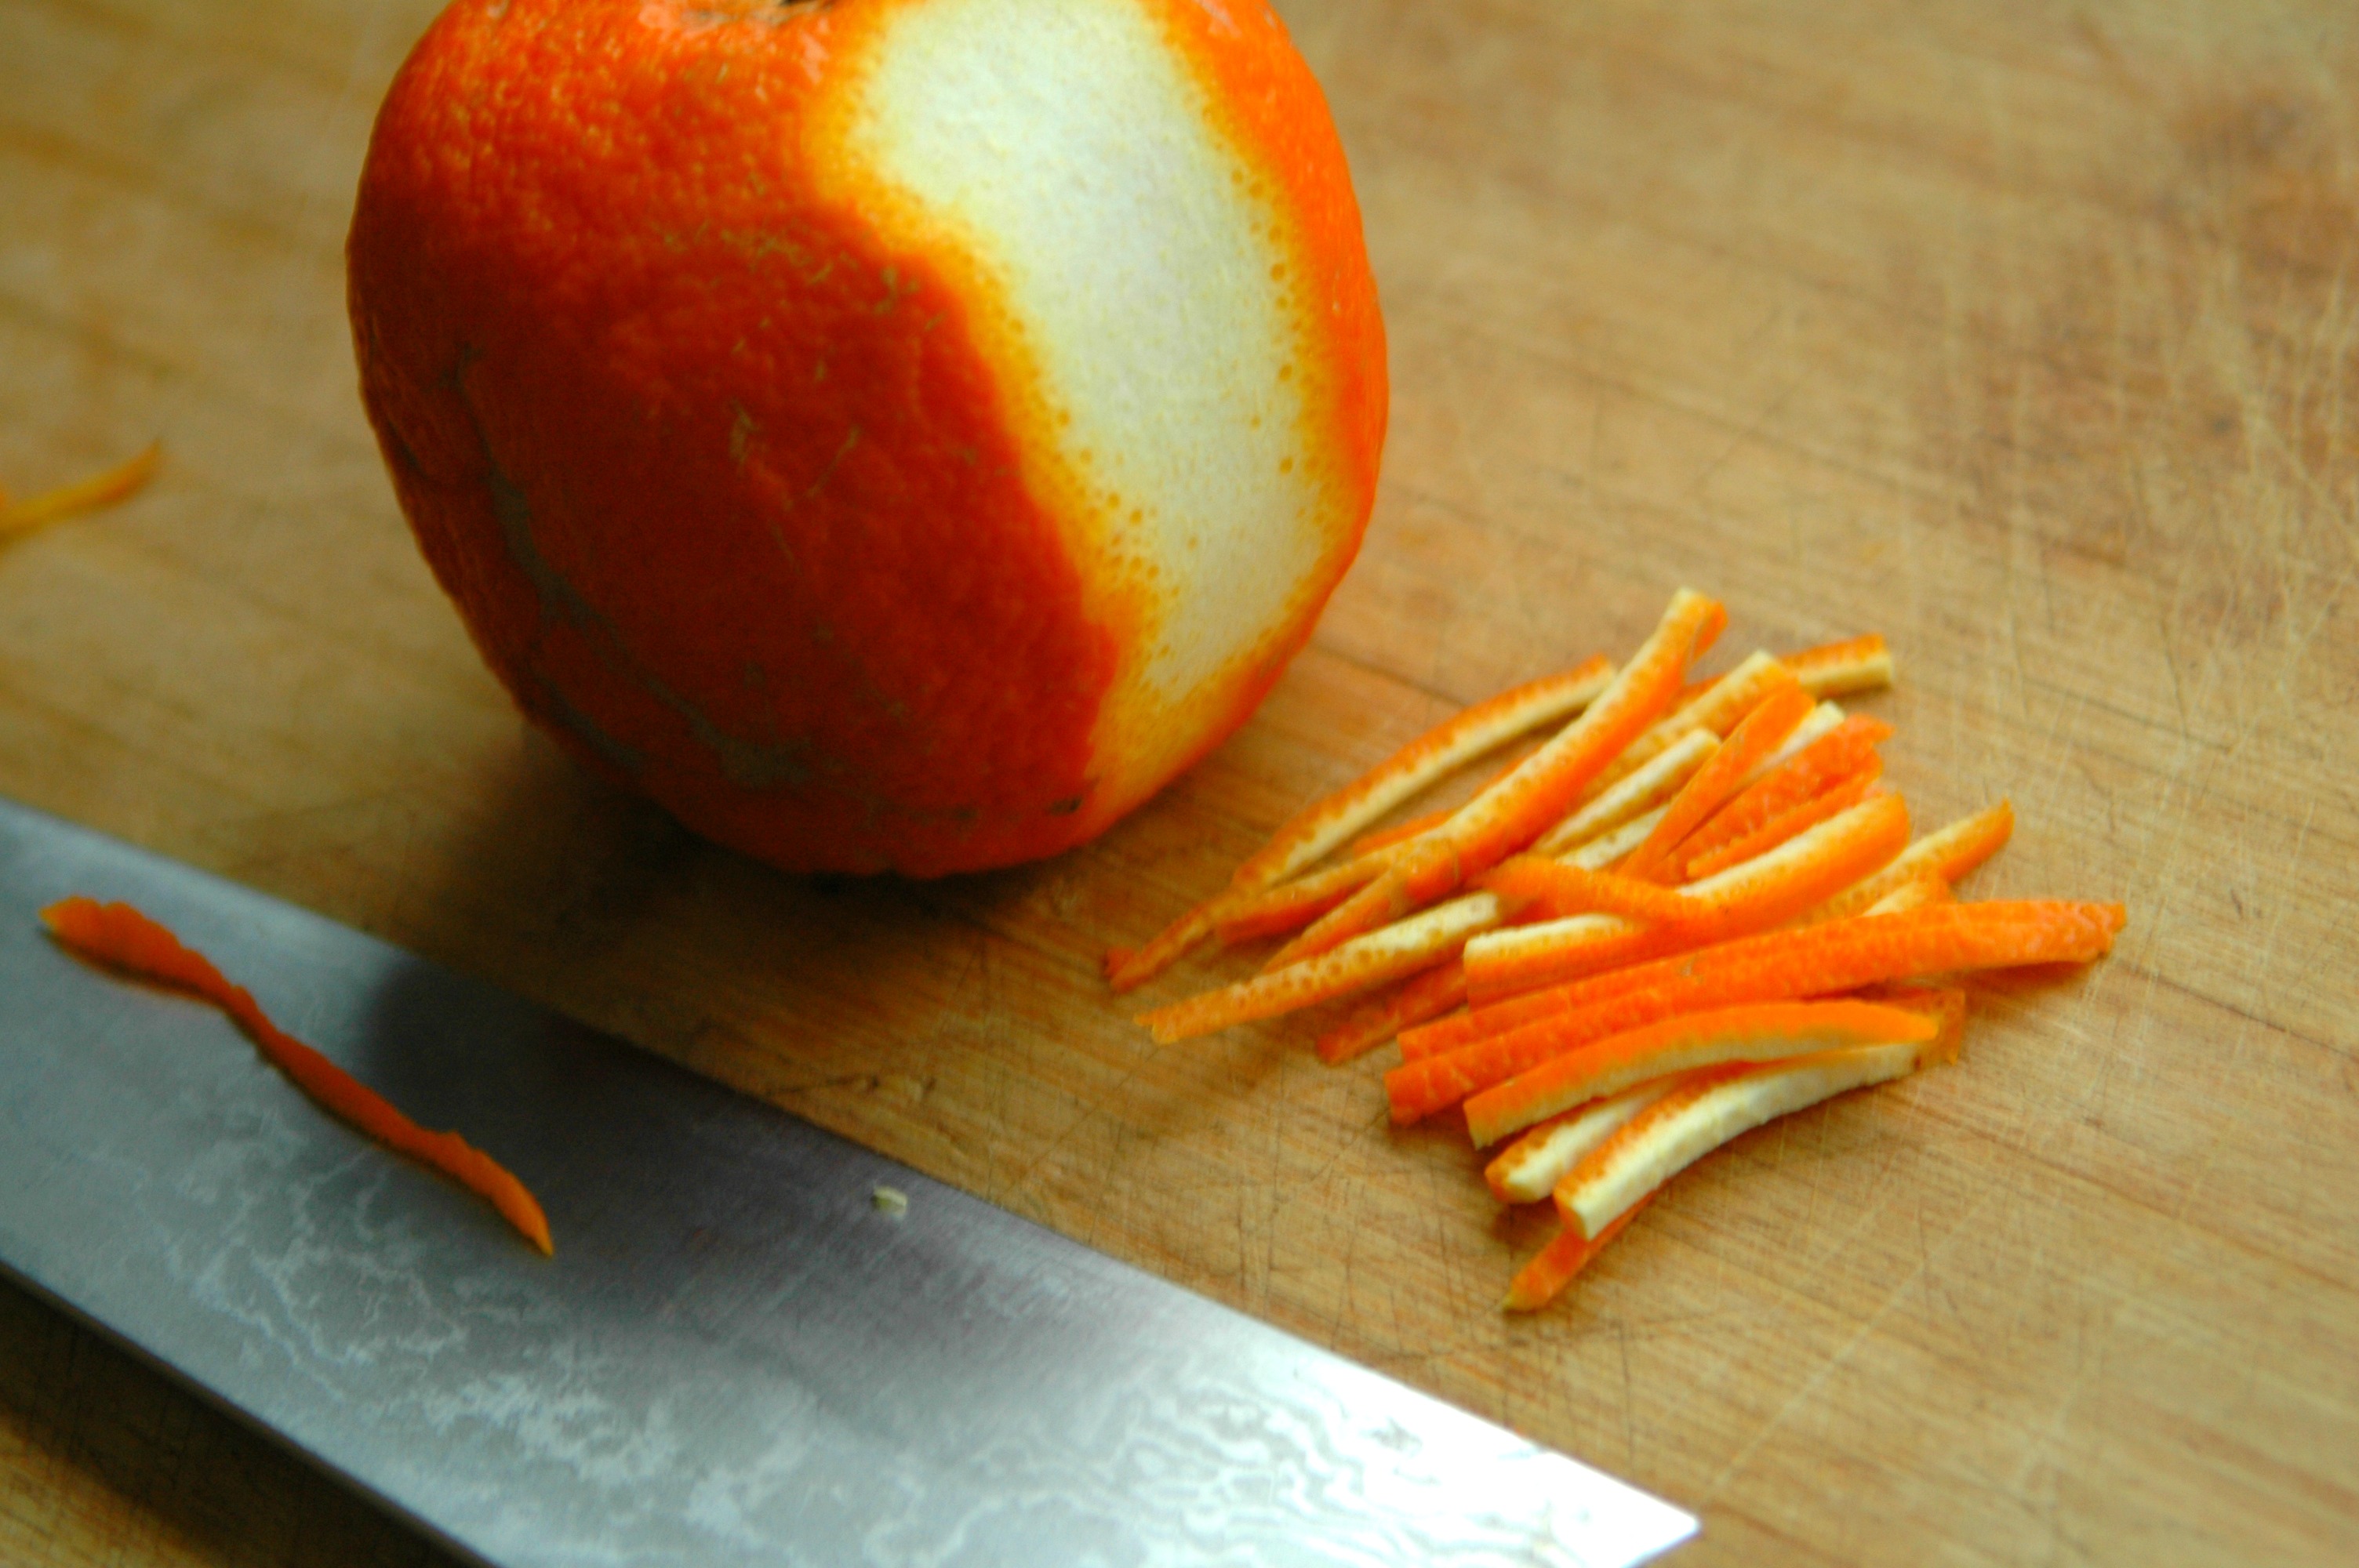
Fine cut peel - best obtained by cutting the peel off with a sharp knife and then chopping it very fine

Medium Cut Peel - best obtained by juicing the orange and then removing all of the membrane from inside the peel, and then cutting into medium size chunks.

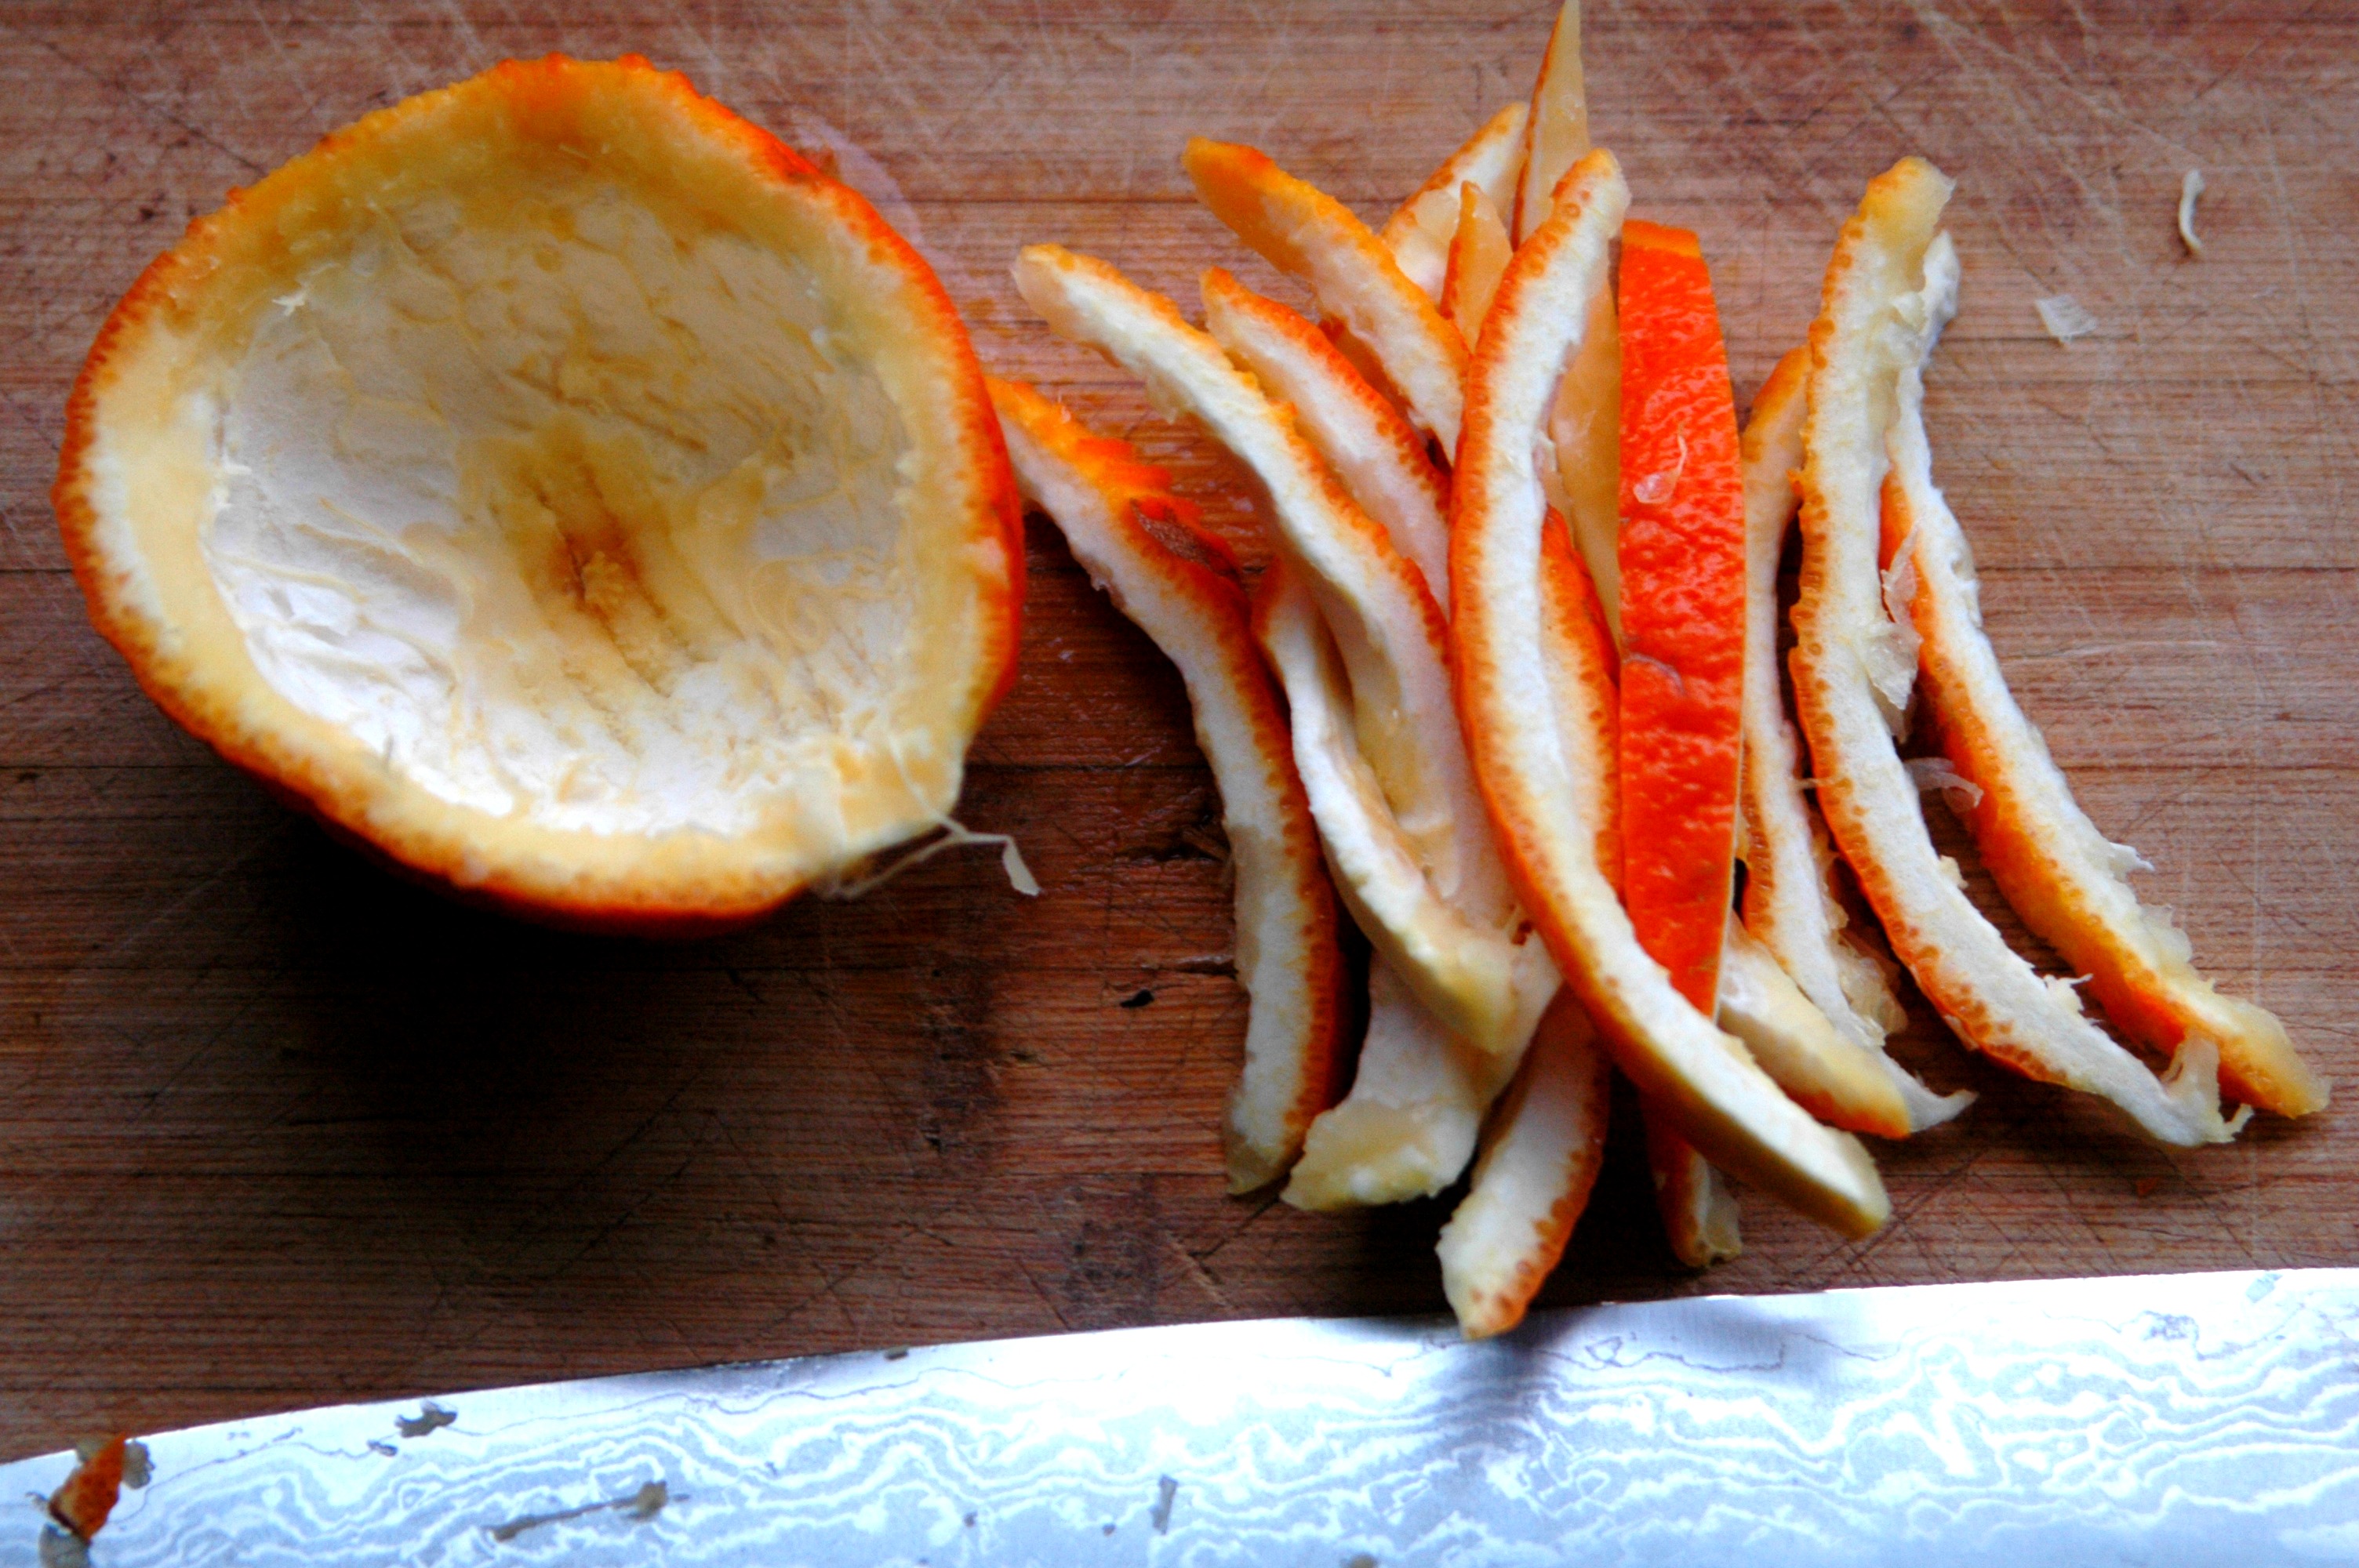
Thick cut peel - best obtained by juicing the orange and then removing all of the membrane from inside the peel, and then cutting into thick size chunks.

Monday
Oct212013

What to do when a jelly doesn't set

 One of the best tips that I learned in my early jelly making days when I would struggle AGAIN and AGAIN with achieving set is one that I sadly had to use on a semi-regular basis when I first started making jelly.

You have a couple of options when the dream jelly you are making doesn't set and instead continues to slosh around in the jar even after the water bath and cool down period.

1) You can get really angry and open each and every jar and pour the contents down the drain (been there, done that).

2) You can decide that even though it is runny you just don't have the energy to do anything further with it and use it as a spread for pancakes, stir it into your yogourt or add it to fruit shakes. This was a personal favourite of mine way back when.

3) You can reprocess the jars and actually achieve the set you meant to get the first time. Now this option tended to be one that I personally avoided like the plague. Mostly because I hate doing something twice. I hate turning back if I forgot something at home...I simply hate doubling back.

But that being said, there is a time and place for everything and sometimes you just want your damn jelly to set. If that is the case, then these simple steps will save the day.

- Empty the contents of each jar into a similar sized pot as you used the first time you screwed up the jelly

- Over low heat (keep stirring) until the jelly melts down and is soft and fluid once again.

- Add 3 tbsp sugar, 1.5 tsp lemon juice for each 250ml jar of jelly that you are re-heating. Keep over the heat and continue stirring until all of the sugar dissolves.

- Once the sugar has dissolved, increase the heat to med-high and bring the jelly back up to a rolling boil. Then stir in 1.5 tsp of liquid pectin for each 250ml jar of jelly that you are re-heating. Continue stirring until the jelly reaching that same rolling boil and boil for 1 minute.

- Skim off any foam, jar and water bath as per the first time.

Tuesday
Aug062013

Pickling Cucumbers - an important tip

It is cucumber season, which in my books means it is time to make some pickles! My cucumbers are in full bloom and every morning I walk out to pick more and more cucumbers. Last week I made Manitoba pickles, but I think the time has come to make classic dill pickles.

If you have decided to try your hand at dill pickles and are perusing recipes out there, you may notice that in a lot of recipes they instruct you to cut off the blossom end of the cucumber. Well what might follow in your mind are a couple of different questions, such as 'What is the blossom end?' and 'Why do I need to cut it off?'

The second question is easy to answer in a few quick words. The blossom end contains enzymes that can cause softening of your pickles.  Remove at least 1/16th inch from the blossom end in order to give your pickles a fighting chance at being nice and crunchy!

If you are picking the cucumbers from your garden it is easy to determine the blossom end...it is opposite to the stem. But what do you do if you are getting the cucumbers from a farmer and are just not sure which is the stem end?

The stem end is indented and smooth (left image), the blossom end is rough (right image).

Happy Crispy Pickling ;)


Friday
Aug022013

5 Time Saving Tips - Pickled Green Beans

My friend Kathleen attended one of my preserving classes at The Depanneur earlier this summer and it is like I have created a monster :). Her latest masterpiece was Blackberry Sage Jam. So when she mentioned that she was about to tackle Pickled Green Beans, I knew I had to throw some of the things I have learned when pickling green beans down on paper and get it over to her asap.

Top Time Saving Tips When Pickling Green Beans

There are a few very simple things such as, getting organized before you even start. Have all your ingredients and tools out and get them set up in a way that works for your kitchen that I will mention right off the start before I get into the tips themselves.

1) After clipping the ends of your green beans lay them out on a cutting board or flat surface near where you will be filling your jars. Ensure all bottom ends of the beans are facing in one direction. This allows you to grab handfulls of beans at once to fill jars and will mean less time fussing in the jar filling stage.

2) If your jars are too short or your beans are too long, don't spend a lot of time getting them to be equal lengths. Just put them into your jars will all the bottom ends of the bean facing the bottom of your jar. Then take a pair of kitchen scissors and trim the beans up to be all one length

3) Don't forget to use a rubber spatula to release air bubbles from inside of the jar after pouring in your brine. You will be amazed how the level will drop after doing this. Top up each jar to the headspace outlined in the recipe.

4) After the water bath if your beans look a little wrinkled, don't deflate and think they are ruined. Sometimes after a week or two of aging they plump right back up. If they remain wrinkled it could be because you used too much salt in your brine or the beans were old. Think of it as a life lesson ;)

5) And the most important tip of all - ALWAYS use a recipe from a trusted source to ensure you end up with a product that has a ph level that is water bath safe. Remember safety first!

Wednesday
Jul032013

Top reasons for why your jars may have lost liquid during the hot water bath

Ever spend an afternoon or even a couple of hours pickling or preserving something tasty only to be disappointed when you pull the jars out of the water bath canner and see that the liquid level has dropped significantly? When this happens you are often left scratching your head and wondering what went wrong and wondering if it is still safe to eat.

The top reasons for this occuring (in no particular order) are:

  • Overpacking your jars. I know we want each jar filled with as much goodness as possible, but it is possible to overpack your jars
  • Ensure that after you have filled the jars with brine that you take the time to release air bubbles before sealing the jars
  • Accurately measure the head space provided in the recipe. Over filling the jars can cause them to overflow in the hot water bath
  • If using the raw pack method ensure the brine or liquid you are adding is still HOT when added to the jars
  • Starchy foods tend to absorb more liquid. So make a note to use more liquid when pickling these types of items
  • Don't over or under tighter the band on the jars. Over tightening can cause too much pressure to build up inside of the jar as air attempts to escape and under tightening can allow the lid with the sealing compound to float up off the jar in the water bath.
  • Ensure that you cover the jars with at least an inch of water during the water bath

Is it still safe to eat?

All is not lost. I wouldn't suggest putting these jars in your pantry and planning on storing them for months. However, if the liquid loss is not significant and if your jars have all sealed properly keep an eye on the jars and eat them up quicker than you originally planned.