February 2014: A Canadian Worth Watching
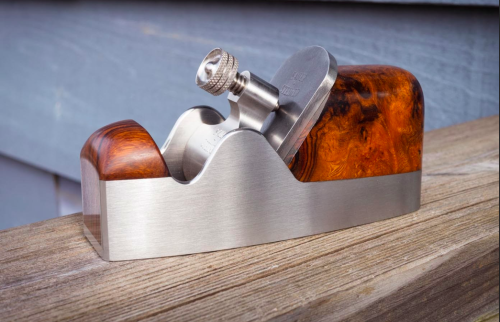 Photo credit: Sauer and Steiner Toolworks
In my previous life, before I became a full time preserver, pickler and jam maker I worked in Marketing. I started off my career in packaged goods, spent a while in traditional marketing and eventually ended up in digital marketing. In the span of years where I was working in traditional marketing I had the pleasure of working with Konrad Sauer. He was an art director at an agency where I was a Project Manager. Kon and I got along like a house on fire. Not only did we work well together but we enjoyed one another's company. He got my sarcastic sense of humour and I think I can go so far as to say he even appreciated it.
Kon took the leap and followed his dreams well before I even knew what my dreams were. See, not only was Konrad an extremely talented designer but Konrad had a talent for woodworking like few others and he had a passion for wood planes.
He had been doing woodworking for long enough to realize that there were not a lot of people out there making quality wood planes and he decided to start a business doing just that. Like me, Konrad didn't just quit his day job and launch into his new business overnight. He moonlighted for quite some time. Being an art director by day and a husband, father and wood plane builder by night. Eventually the time came where he knew it was time to transition and he hasn't looked back since.
 Photo credit: Sauer and Steiner Toolworks
I cheered Konrad and his decision to follow his dreams on from the sidelines, and occasionally sit down to read his blog and admire his work. I believe him to be one of the most talented people I know and I am thrilled for the success he has achieved. And I know that Konrad is sitting on the sideline cheering me on in my new venture.
You should really take a few moments and get lost in his blog. His projects are amazing, his approach is fascinating and the work he does is astounding. He is a Canadian to keep an eye on.
This post is part of The Canadian Food Experience, it began June 7 2013. As we share our collective stories through our regional food experiences, we hope to bring global clarity to our Canadian culinary identity.
 Christine Manning